


These instructions complement (but do not replace) the general rules for preparing and holding state examinations with respect to the specific characteristics of MS Teams. For ensuring all functions, it is recommended to have the MS Teams application installed as the desktop version.
Phase 1: Organizing the examination
Creating a term for the examination
MS Teams has many options for creating online meetings. We recommend creating a meeting via the calendar and the button “New Meeting” (see instructions for Creating and Scheduling Meetings in MS Teams). When planning the terms, you can consider the number of students taking the exam, and according to preferences, create an online meeting using two methods:
- Create a separate online meeting/exam for each examinee (i.e. each student will have their own online meeting corresponding to the term and time schedule of the state exam).
- The advantage of this method is that each student has their own unique link to the meeting. No other student on the wating list will be able to access it and thus no interruption will occur.
- Another advantage is that, when recording, only one video is available to the student (to view – see below).
- In the case of participation of the public, care must be taken to ensure that links to all online meetings are published.
- The committee and other participants in the exam must always register for a new meeting.
- Create a joint online meeting/exam for all examinees in one term (i.e. all students will connect to the joint meeting).
- An indicative time schedule must be provided for student registration.
- A disadvantage is that, when recording, you must create separate videos for each student. Also, all videos are accessible to all conference participants.
- With the participation of the public, only one link needs to be published for the state exam.
- The committee and the other exam participants are only in one meeting for the entire time.
Vytvoření a zabezpečení online schůzky v MS Teams
Tento postup vám pomůže vytvořit hodinu v MS Teams tak, abyste předešli účasti nezvaných hostů, kdy se vám do místnosti připojí nepozvaný student bez vašeho vědomí a začne sdílet nevhodný obsah. Při sdílení linku na zkoušku prosím vysvětlete studentům, že se do MS Teams musí přihlásit pomocí jejich osobního čísla ve tvaru číslo_osoby@cuni.cz a následně pomocí přihlašovacích údajů do CAS. (V případě fakultních účtů lze využít i tuto variantu. V návodu dále používán účet cuni).
Při plánovaní zabezpečené online zkoušky v MS Teams postupujte následovně:
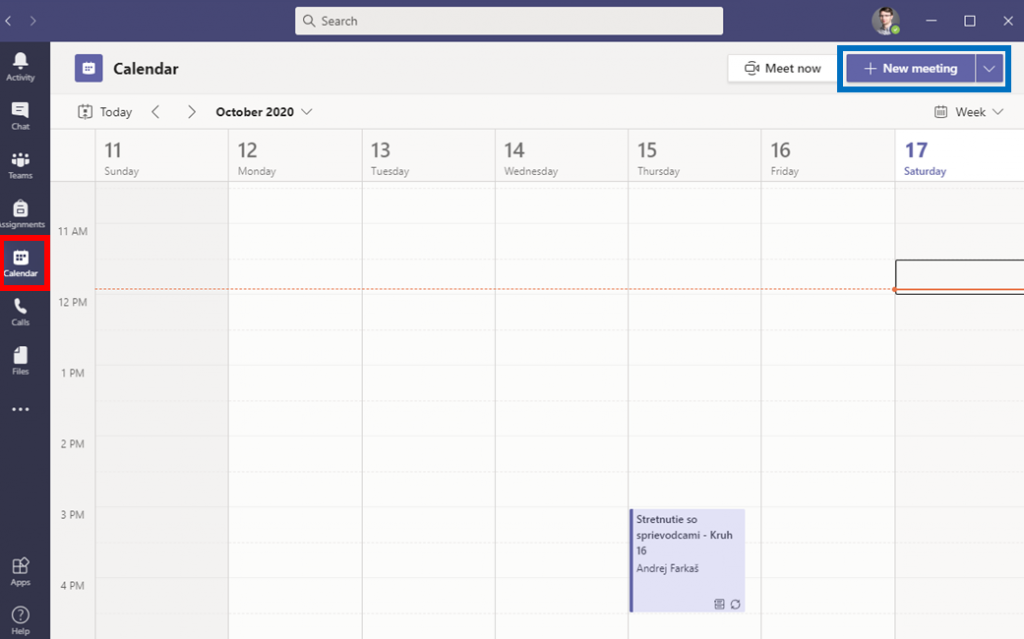
1. Kliknete na položku Calendar / Kalendář (červená barva) a následně na tlačítko New Meeting / Nová schůzka (modrá barva). Vyplňte název, datum, čas konání a přidejte alespoň jednoho účastníka, např. sekretářku/tajemníci (žlutá barva). Možnost Does not repeat / Neopakuje se necháte bez změny (zelená barva). Následně kliknete na tlačítko Save / Uložit.

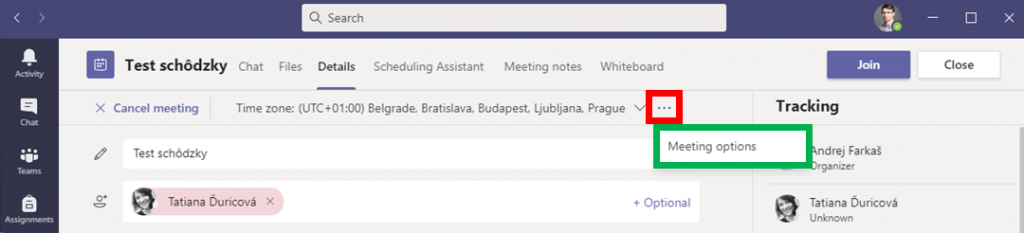
2. Vytvořenou schůzku naleznete ve vašem MS Teams kalendáři. Když znovu kliknete na ikonu Calendar / Kalendář a na svoji vytvořenou schůzku, otevře se vám možnost dále upravovat schůzku. Kliknete na ikonu tři tečky (červená barva) a vyberete možnost Meeting options / Možnosti schůzky (zelená barva). Budete přesměrováni na webovou stránku s rozšířenými možnostmi.
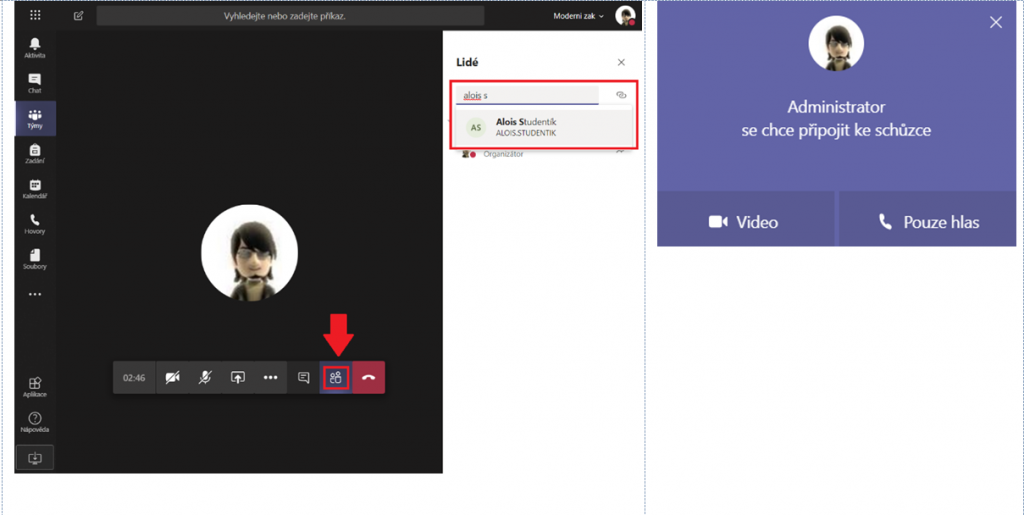
V první možnosti Who can bypass the lobby / Kdo může obejít předsálí? Můžete zvolit People in my oranization / Lidé v naší organizaci. Do Vaší schůzky se bez Vašeho povolení dostanou pouze studenti přihlášení prostřednictvím účtu cuni ve tvaru číslo_osoby@cuni.cz a dále pomocí přístupových údajů do CASu. Doporučujeme však zvolit možnost Only me / Jenom já. Všichni účastnící, kteří se přihlásí na danou schůzku, budou vpuštění z předsálí do schůzky až po přijetí (vyšší stupeň zabezpečení).
Možnost Always let caller bypass the lobby / Vždy povolit volajícím přeskočit předsálí ponechte v nastavení Ne.
V možnosti Who can present / Kdo může prezentovat? zvolte Only me / Jenom já. Při tomto nastavení můžete sdílet obrazovku pouze vy. V případě, že mají obrazovku sdílet také studenti, jako organizátor schůzky můžete práva přidělit /odebrat, a to i dodatečně všem účastníkům v průběhu schůzky kliknutím pravým tlačítkem myši na daného účastníka. Pro uložení nastavených změn klikněte na tlačítko Save / Uložit.

3. Nyní máte připravenou místnost na online zkoušku. Studenti a ostatní členové zkoušky se do ní mohou přihlašovat pomocí odkazu, který si zkopírujete po otevření detailu schůzky v kalendáři kliknutím pravým tlačítkem myši na text (červená barva) a možností copy link / kopírovat odkaz.

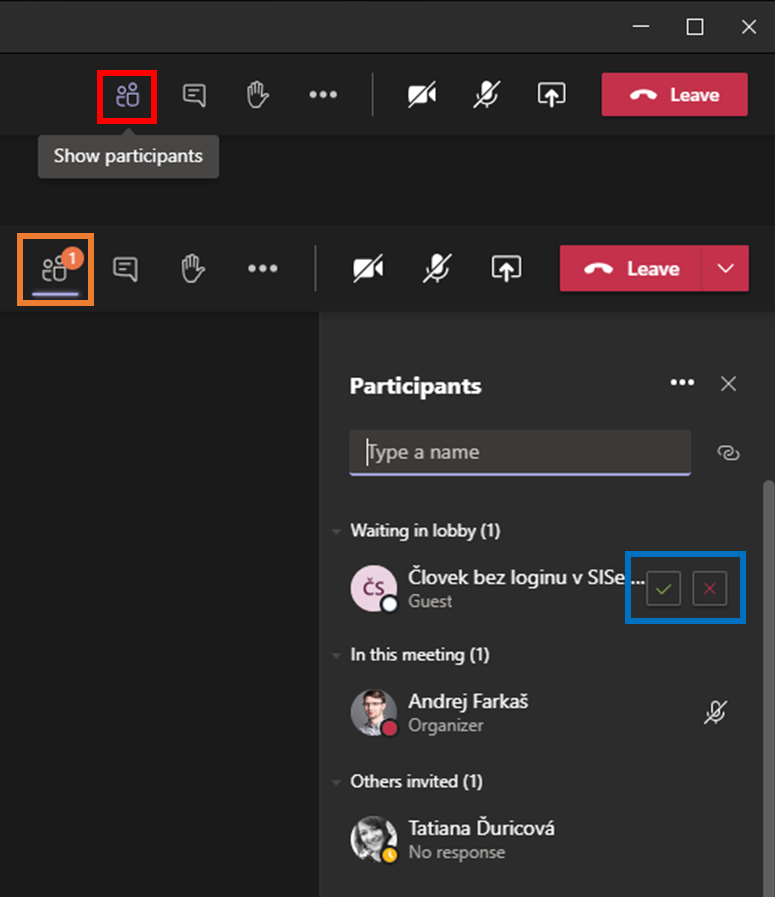
4. Student se po kliknutí na odkaz dostane do tzv. Lobby / Předsálí. Přihlášení studenti se Vám zobrazí po kliknutí na ikonu lidí Show participants / Zobrazit účastníky (červená barva). V případě, že se někdo připojí bez přihlášení pomocí účtu cuni ve tvaru osobní_číslo@cuni.cz a hesla CAS, dostanete upozornění prostřednictvím ikony účastníků (oranžová barva). V panelu účastníků následně uvidíte osobu, které můžete povolit nebo odmítnout vstup na přednášku (modrá barva).
Inspection of technical conditions
The examiner/administrator set it up in Meeting options so that only the student and the examiner are in the role of presenter and can share the desktop, manage the meeting, etc. and also so that only people from the organization can be automatically allowed entry from the lobby (so that an anonymous person without an invitation does not connect to the meeting) – see the instructions Creating and Scheduling Meetings in MS Teams.
In addition to the general rules (see above), you should inform the student of the following in the invitation to the online meeting:
- The student must install the MS Teams application in advance.
- The student must be logged in to the local MS Teams application via their Office 365 account IDnumber@cuni.cz, (e.g. 12345678@cuni.cz)– see instructions for logging in to MS Teams.
- The student may try the test call themselves in MS Teams – this call does not replace the option of a test call with the exam administrator. The instructions for setting up the camera and microphone can be found here.
Note: You can also connect to the meeting in a supported web browser, Chrome or Edge, but the student will not be able to also use the camera and share the content of their computer’s screen. Thus, it is highly recommended to install the MS Teams application in advance. When allowing participation of the public, participants other than the committee and the student do not need to install the application.
RECORDING: If you are recording in MS Teams, the recording is automatically saved to the Microsoft Stream service in MP4 format and made available even to the student. After finishing the recording in MS Teams and saving it to the Stream service, the meeting administrator needs to remove the student’s access to the recording or the administrator needs to download the recording from the Stream service and then deleted it in Stream, making the recording inaccessible to the student. Instructions for working with Microsoft Stream can be found here: https://docs.microsoft.com/en-us/stream/.
The recording also takes place simultaneously in OBS Studio on the local computer of the administrator/examiner to prevent the recording from being intentionally or unintentionally switched off by the student or the examiner or to prevent any technical difficulties with the processing of the recording on the part of Teams.
Phase 2: Commencing the examination
- Separate online meeting/exam
- The committee members must log in to the specific online meeting of the examinee.
- The student connects to their planned online meeting/exam in MS Teams.
- In the case of arranging a student’s preparation for the exam, it is possible for two simultaneous online meetings to take place at the same time:
- One student prepares in their online meeting “in wristbands”.
- The other student is being tested in another online meeting.
One of the examiners/the administrator joins the online meeting, who will ensure the initial verification of the student’s identity, check the settings on the side of the student, have the student draw a question (see general rules of the state exam), and supervise the student during preparation. Meanwhile, another student’s exam takes place in another online meeting.
- In the event of recording, the examiner informs the student that the exam will be recorded and that the student must not manipulate the recording (in order for the student to share their screen, they must be in the role of presenter, thanks to which they have the right to turn on/off the recording in Teams).
- Note: After finishing the testing of one student, the committee must log in to the other meeting.
- Joint online meeting/exam
- The committee members connect to the created online exam on the specific day.
- The students connect on a gradual basis according to the schedule agreed to in advance or they may be invited to the meeting in stages – see below.
- Student are invited to the distance exam.
- In the case of arranging a student’s preparation for the exam, it is possible for two simultaneous online meetings to take place at the same time:
- One student prepares in the “preparatory” online meeting.
- The other student is tested in the “main” online meeting.The student first logs in to the “preparatory” online meeting where one of the examiners/the administrator joins the online meeting, and who will ensure the initial verification of the student’s identity, check the settings on the side of the student, have the student draw a question (see general rules of the state exam), and supervise the student during preparation. Meanwhile, another student’s exam takes place in the “main” online meeting. After finishing the preparation, the student logs in to the “main” online meeting and takes the exam.
- This method is not recommended when recording a state exam, because two different videos would need to be created – preparation and testing. In the event of recording, the examiner informs the student that the exam will be recorded and that the student must not manipulate the recording.
- Inviting students to the distance exam: After the preparation, it is possible to invite the student ad hoc to the “main” online meeting, where the student will be tested. The student will then be notified in MS Teams that the examiner is trying to connect to them via an online meeting and will accept the invitation
Phase 3: Holding the distance examination
- For a more natural environment for the student during distance examinations, it is recommended that even the examiner turn on their camera. In this way, the student may respond more naturally to the questions and not feel separated from reality (online exams without visual contact could be confusing/stressful for people who are not used to it, which could affect their exam performance). If a student has problems with the quality of their Internet connection, turn off the incoming video of the examiners in Teams (Turn off incoming video).
- If there is sound interference during the distance exam, the examiner turns off everyone’s microphone except their own (Mute all), informs everyone present, including the student, asks them to correct it if the cause of the interference is on their side, asks the student to turn their microphone back on, lets the student speak again.
- The examiners may also use chat during an exam, e.g. it is possible here to speak or ask another question.
- If there is a need among the examiners to vote on the results of an exam, it is not recommended to use chat/audio in an online meeting of an exam for this, because the student can also see/hear this.
The examiners may consult each other using a private chat in Teams OUTSIDE the meeting. After informing the student of the results, the examiner turns off the recording in MS Teams and also the local recording in OBS Studio.
Phase 4: After the examination
- It is recommends to leave a time reserve between the individual exams of students (e.g. 5 to 10 minutes) for resolving technical problems on either side, etc.
- The records of online meetings/exams recorded in Teams are available in the Stream service. Note: If the exam was recorded in Teams, it is not desirable for the examinee to have access to the exam record. The meeting administrator or examiner who initiated the recording in Teams must remove the student’s right to the record in the Stream service so that the student cannot access the record. Alternatively, the meeting administrator or examiner who initiated the recording may download the recording, making the recording inaccessible to all participants in the online meeting.
Note: Although the student in the default setting has the right to see the exam record (it is automatically shared with the student), the student is not entitled to download the record from the Stream service, provided the student has not initiated the recording themselves (see note on the ban on manipulation with the record by the student in the text above).
Checklist – State final examinations in MS TEAMS
Organization of the state examination
☐ Preparation of the meeting/terms of the exam in Microsoft Teams according to the assigned terms in SIS.
☐ Informing the student of the time of the exam and preparations in MS Teams.
☐ Sending instructions for installation.
☐ Making the test call.
☐ Inspecting the technical parameters.
☐ Inviting the student to the online meeting for the state exam (according to the registered terms in SIS).
☐ (In the event of participation of the public, publishing the link for logging in.)
Holding the state examination
☐ All committee members and the student logging in to the online meeting.
☐ (turning on recording)
☐ Verifying the student with an ID card, inspection of room and tech parameters (+ inspection of application), sharing of screen.
☐ (In the event of participation of the public, confirming the exam participants, waiting in the lobby.)
☐ Informing about the exam.
☐ After the exam, the committee decides on a mark and communicates the results to the student = completion of the exam.
☐ (ending the recording of the state exam)
After the examination
☐ Downloading the record in MP4 format from Microsoft Stream (or removing the rights for participants of the state exam, including the student).
☐ Saving the record from OBS Studio.
☐ Saving the record to ESSS CU.


